
Regions, Surfaces & Extruding
- Lesson 3-1INTRODUCTION TO 3-D (Terminology)
- Lesson 3-2ISOMETRIC DRAWING IN AUTOCAD
- Lesson 3-3WORKING IN 3 DIMENSIONS (X,Y,Z Axes, 3D Rotation)
- Lesson 3-4VIEWING 3-D OBJECTS (Perspective Views, 3D Orbit, DView)
- Lesson 3-5BASIC WIREFRAME MODELS
- Lesson 3-6LINE THICKNESS
- Lesson 3-7REGIONS AND 3-D FACES AND EXTRUDING
- Lesson 3-7aMORE ABOUT EXTRUDING & LOFTING
- Lesson 3-8REVOLVED OBJECTS - REVSURF AND REVOLVE
- Lesson 3-9ADDING MATERIALS IN AUTOCAD
- Lesson 3-10PRIMITIVE SOLIDS
- Lesson 3-11BOOLEAN OPERATIONS AND 3D EDITING
- Lesson 3-12CHANGING FROM THE WCS TO THE UCS
- Lesson 3-13MAPPING MATERIALS
- Lesson 3-14CREATING NEW MATERIALS
- Lesson 3-15EXTRA PROJECTS AND A TUTORIAL
- Lesson 3-16PUTTING IT ALL TOGETHER - MODEL A BUILDING
- Lesson 3-17INTRODUCTION TO RENDERING AND LIGHTING IN AUTOCAD
- Lesson 3-18CREATING ANIMATIONS IN AUTOCAD
- QUIZ FOR LEVEL 3 - 84 QUESTIONS
Topics covered in this Lesson:
Regions | 3D Surfaces
In this lesson, you'll begin using true 3-D commands. First you will create a 2-D region and then extrude it into a 3-D solid. Then you will add 3-D surfaces to the tops of your previous drawing (line thickness) to close the back, sides and seat.
Begin a new drawing with the acad.dwt template.
Create 3 layers called SIDES, SEAT, and BACK and give them different colors.
Draw the outlines (using rectangles) of the back, sides and seat as you did in Lesson 3-6, but don't add line thickness.

You'll start by creating a region for the back of the chair. Make sure that back is your current layer. (Any region you create will be on the current layer, regardless of which layer the object was on when you selected it.) Start the region command by entering REGION (or REG) at the command line. Pick the polyline that will become the back of the chair and press enter. Your command line should look like this:
Command: REG
REGION
Select objects: <SELECT A RECANGLE> 1 found
Select objects: <ENTER>
1 loop extracted.
1 Region created.
If the Region wasn't created, it usually means that you have a gap in the shape. Polylines must be closed to be used for Regions. Repeat this for the other polylines representing the 2 arms and the seat, ensuring that you have the correct layer current.
At this point, you have four 2D regions. The next step is to extrude them into 3-D solid objects. Make BACK the current layer and start the EXTRUDE command. Pick the region on the back layer. Look at the command line. You will be asked a few things:
Command: EXT EXTRUDE
Current wire frame density: ISOLINES=4, Closed profiles creation mode = Solid
Select objects to extrude or [MOde]: <SELECT REGION> 1 found
Select objects to extrude or [MOde]: <ENTER>
Specify height of extrusion or [Direction/Path/Taper angle/Expression] <4>: 20
The first thing that AutoCAD needs is the height of the extrusion. This is similar to the thickness that you gave the polylines in Lesson 3-6. Remember that if you give a positive number, it will extrude in the positive Z-axis. If you give a negative number, it will extrude the region in the negative Z-axis.
Note: In earlier versions you were asked for the 'Extrusion Taper Angle'. In most cases this will be the default of zero. If you're using an older version and see this, press <ENTER> to accept the default.
Note: You can also extrude directly from rectangles, circles and closed polylines, but I wanted to show you the Region command. If you have 4 lines that make up a shape, you can't extrude the lines, but you can use the Region command to create an extrudable object.
EXTRUDE the sides and seat. Remember to move the seat up 12" in the positive Z axis if you haven't already. Check that the model is correct by viewing it in the SW isometric view. Type HIDE (HI) and you should see a solid chair like the one below.

Now you can see how solids are a good way to go in some cases. They will usually give you the most accurate way of viewing the model. You can also get a lot of information out of a solid. Start the Mass Properties commands ( MASSPROP). Click on one of the solid objects and press <ENTER>. You'll see that AutoCAD can give you a lot of information about it. A lot of these are useful in engineering applications, but the volume is something that may be needed in many different instances. As you'll see in the next lessons, you can do a lot with solids.
Save your drawing under the name: chair_extruded.dwg
Video: Extruding in AutoCAD
Adding Surfaces
Open your chair_line_thickness.dwg drawing and immediately save it under a new name: chair_3D_face.dwg
What you're going to do is add 3-D faces to the tops of the back, sides and sides. Begin by viewing your model in the SW Isometric view. Type HIDE to see where you need to cap off the extruded lines. Type REGEN or RE to regenerate your screen so you can see all the corners again.
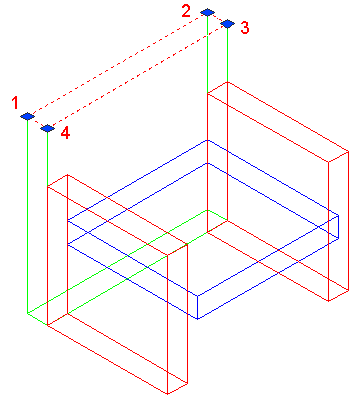
Make sure that BACK is the current layer. Type 3DFACE to begin the command. You will be asked to select some points. Make sure that your endpoint Osnaps are on.
When asked to pick the points, select them in the order as if you were drawing a rectangle. Do not go from one corner to an opposite one. After you have picked the fourth corner, press (enter). Your command line should look like this:
Command: 3DFACE
Specify first point or [Invisible]: <1>
Specify second point or [Invisible]: <2>
Specify third point or [Invisible] <exit>: <3>
Specify fourth point or [Invisible] <create three-sided face>: <4>
Specify third point or [Invisible] <exit>: <ENTER>
Repeat the command to add 3-D faces to the top of the sides and the seat. 3D faces are great for making odd shapes that include any four lines (or arcs) that are touching).
Enter the HIDE commands to check that it was done correctly. If it all worked, you should see an image that looks identical to the solid model. You'll notice that the 3D face covers what would be the opening at the top of the arms and the back. If it was done incorrectly, there may be a line running down from the back corner of each piece. Save the file.
3DFace objects can be extruded. You can also create more complex shapes using this command by continuing to select points. Here's another exercise to show how this works. Draw the shape below:

Look at the next image and see where you will be picking points. The goal is to cover this area in (three sided) 3DFaces using the command just once.

Start the 3DFACE command and pick the points on the corners as shown above. After picking the 11th point, press enter to create the last 3DFace and end the command. You can now extrude the faces for more practice.
Now you have created some true 3-D objects. Take some time to think about how much work was involved in each method: Wireframe, line thickness and extruding. Think about instances where one might be better than the other. Review the methods that you have used so far.
Video: Faces & Extruding Text in AutoCAD
Extra Practice: Create a 3D solid model of this drawing. Start with the bottom profile and create a region, then extrude the region. Save this and other exercises for using in Lesson 3-9 (adding materials).
Extra Practice: Create a 3D solid model of this drawing.
You Scored:

Fun fact: AutoCAD designers earn in average 52,555/yr (2019, USA)
Please support
MyCADsite.com
Give a donation!
Donate

- To cover this months server costs
- Exceeding amounts will go to creating new content
- Even a penny will help
Did you like the lesson? ❤️