
Creating an Animation in AutoCAD
- Lesson 3-1INTRODUCTION TO 3-D (Terminology)
- Lesson 3-2ISOMETRIC DRAWING IN AUTOCAD
- Lesson 3-3WORKING IN 3 DIMENSIONS (X,Y,Z Axes, 3D Rotation)
- Lesson 3-4VIEWING 3-D OBJECTS (Perspective Views, 3D Orbit, DView)
- Lesson 3-5BASIC WIREFRAME MODELS
- Lesson 3-6LINE THICKNESS
- Lesson 3-7REGIONS AND 3-D FACES AND EXTRUDING
- Lesson 3-7aMORE ABOUT EXTRUDING & LOFTING
- Lesson 3-8REVOLVED OBJECTS - REVSURF AND REVOLVE
- Lesson 3-9ADDING MATERIALS IN AUTOCAD
- Lesson 3-10PRIMITIVE SOLIDS
- Lesson 3-11BOOLEAN OPERATIONS AND 3D EDITING
- Lesson 3-12CHANGING FROM THE WCS TO THE UCS
- Lesson 3-13MAPPING MATERIALS
- Lesson 3-14CREATING NEW MATERIALS
- Lesson 3-15EXTRA PROJECTS AND A TUTORIAL
- Lesson 3-16PUTTING IT ALL TOGETHER - MODEL A BUILDING
- Lesson 3-17INTRODUCTION TO RENDERING AND LIGHTING IN AUTOCAD
- Lesson 3-18CREATING ANIMATIONS IN AUTOCAD
- QUIZ FOR LEVEL 3 - 84 QUESTIONS
Topics covered in this Lesson:
An introduction to Making an Animation / Walkthrough in AutoCAD
One of the great things about AutoCAD is that you have a number of ways to display your design to other people. If you draw in 3D, you can show it from any angle, in any material and any lighting. It's amazing what you can do. This tutorial will show one more option - animation.
Animation - or exporting a video - is a great way to communicate your idea to someone less technically minded. It could make the difference between selling a product, or just getting a blank stare from a client. Almost everyone can look at a video and imagine what the final product might look like.
Here is a very simple video I made to show what you can do with AutoCAD's animation tools:
Video: Sample Animation in AutoCAD
First we'll start with a simple animation of a small model. This is something you might use for a presentation of a mechanical part design.
Here is the file that you will need, for now we won't worry about a realistic rendering, I'll just show the steps I used to create the video shown above. Download and open this file and you should see something like this:
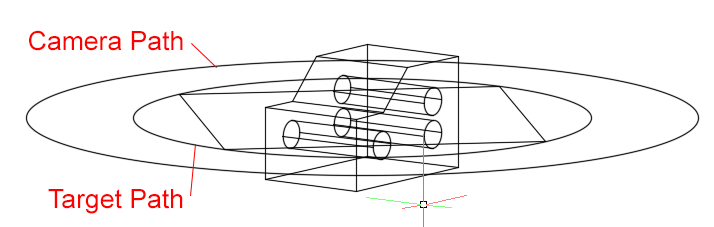
What you see is the main object that we want to show (the block with holes drilled in it) and two circles. The outer circle will be the path that the camera follows as it 'shoots the video' and the smaller circle is the path the camera will look at (target) as it creates the video.
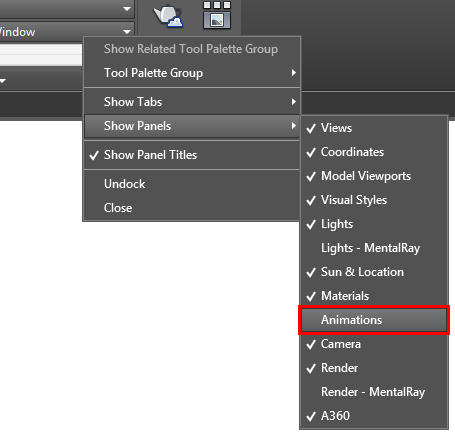
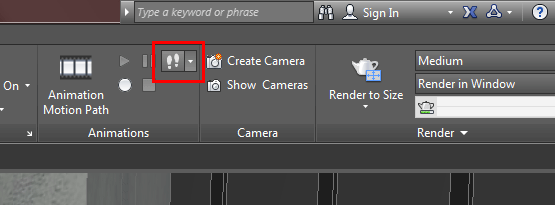
You'll need to see the 'Visualize' ribbon for this lesson, so make sure your workspace is set to "3D Modeling" otherwise you won't see it. Then look for the Animation Panel. If you don't see the Animation Panel you will have to turn it on. Right click on the palette and click on "Show Panels" and select "Animations" so that there will be a check mark beside it.
Now you can select the icon to start the setup of the animation.
Of course, the easiest thing to do is just type in ANIPATH to start the command - remember how in Level 1 I said that typing commands is faster?
No matter how you start the command, you will see a new dialog box appear:
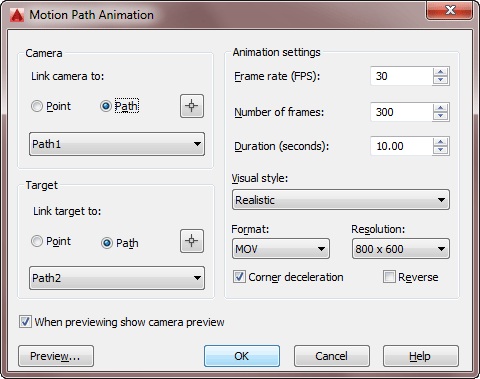
Like any new dialog box, start at the top and work your way down. First link the camera to a path (the outer circle) by picking on the crosshairs icon at the top. Pick the outer circle and then accept the default name in "Path Name" dialog that appears after you select it.
Now link the target to the inner circle using the same method.
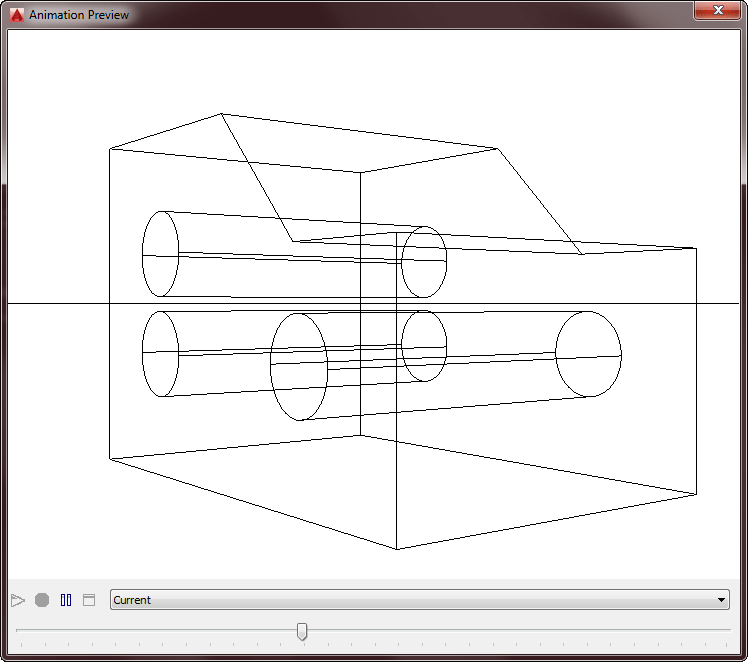
You're ready to do a quick preview, so click on the "Preview..." button. This will bring up a simple video player to show you the preview:
Now that you know what the animation will look like, you can set the video settings on the right side of the dialog box. Make the adjustments you need as shown below. This will create a 10 second video at 800x600 with a 'realistic' rendering style as shown in the sample video at the top of the page.
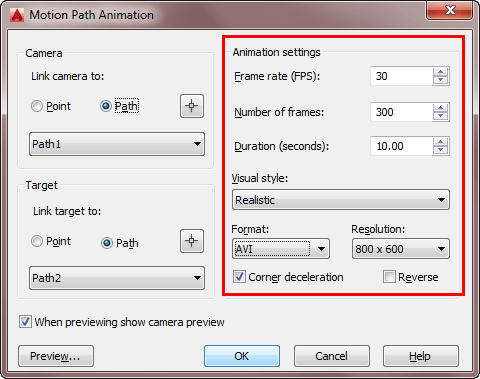
When you have it all ready to go, press the OK button and save the video in a place you can easily find it. After it renders, open the video in whatever video player you have on your computer and check it out! If your computer can not play the chosen output format (AVI in this example) try a different format.
If you're paying attention, you noticed a rectangle near the inner circle in the sample drawing. I added this in so that you could see how selecting a different target path would affect your video. Create another video using the same process as above, but link the target to the path of the rectangle. Render the video and see the difference.
Now that you know how the process works, try some variations of your own. See what the different "Visual Styles" look like and think about how one style might be preferred over the other depending upon the design you are showing.
Create a spline to use as your camera path. This can be and open or closed spline. Think about what angle might be best for showing this simple block, then try to imagine what you might do for a house (which we'll work on next).
This next animation will use the same process, but with a more complex model. If you draw the small cabin in the last tutorial and added materials, then you're ready. If you didn't (and you should have drawn it!!) then you can download the basic model here without materials.
Video: Sample Rendered Animation in AutoCAD
If you have the materials added to your drawing, you can choose the "Render" option for Visual Style - but be prepared that you will keep AutoCAD busy for up to an hour (or longer depending upon your computer). If you don't want AutoCAD tied that long, try a different Visual Style.
The purpose of using this building model is to show you the computing power needed to create animations. The simple block object we used at the beginning of lesson was selected for a reason. It allowed you to test different settings without having to wait very long for results.
Creating a Walkthrough Video
For some of you a walkthrough video might come very naturally. If you've ever played a 'first person' type video game, then this is almost the same thing. Here's a sample video of a recorded walkthrough in AutoCAD.
Video: Sample Rendered Walkthrough in AutoCAD
As you can see, my video game skills are a lacking, but you get the idea. All of the camera movement in that video was controlled by my mouse. You can also use the 'arrow' keys to control the camera.
Here's how to set up a simple walkthrough. If you don't already have the 'cabin' file open, get it open again and open the Animation panel if needed. Look for the 'feet' icon that will start up a new palette for you.
When you click this icon, you'll see the "Position Locator" palette appear. What this shows is the overall model space you're working with. At the top, you'll see zoom icons - try these out first.
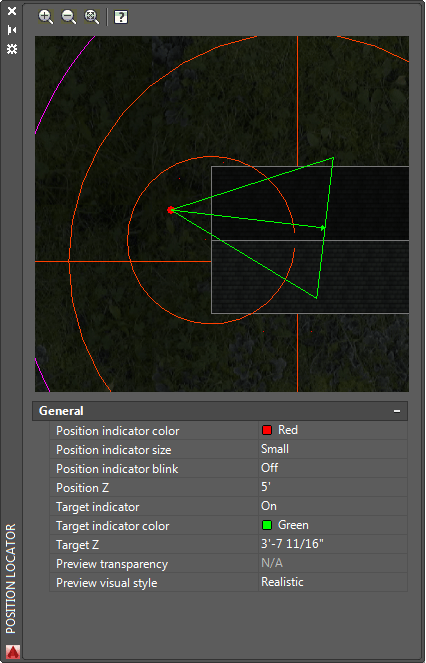
If you click in the window at the top, you can use the scroll wheel of your mouse to zoom in and out as well. You will also see a green triangle - this represents your camera with the camera at the red dot in the triangle, and the 'cone' representing the view you will see. You can practice dragging this around and see the result in your main drawing screen.
Video: Creating a Walkthrough in AutoCAD
Learn to Fly
There is one other option you have for animating your model, and that is the 'Fly' mode. The process is the same as a walkthrough, but the difference is that you can change your elevation. In walkthroughs your elevation, or Z axis location remains the same. You can look up or down, but you stay at the same 'height' - just like walking.
When you are in Fly mode, you can point the camera up or down and then move towards that point and change your Z axis location. Use the Fly icon and setting just like you would a walkthrough, but see how your elevation can change.
For Further Thought:
In many of my tutorials I've tried to explain the advantage of using AutoCAD as more than just another way to draw things. What you have learned just now is a valuable tool that will let you communicate with clients who may have trouble visualizing what you have designed or drawn.
A simple 10 second animation video can save hours of tedious explanation. The bottom line here is to learn what tools you have available and when to use them to best get your point across. As you have seen, video is not a difficult concept to learn, but it can be a very powerful tool in your toolbox. Learn to master it if you are drawing in 3D.
You Scored:

Fun fact: 2007 - The founder John Walker wrote a diet book, an engineer's approach to dieting called The Hacker's Diet.
Please support
MyCADsite.com
Give a donation!
Donate

- To cover this months server costs
- Exceeding amounts will go to creating new content
- Even a penny will help
Return to top of the lesson | Return to the table of contents
Take Level 3 Quiz
Continue To Next Level
Did you like the lesson? ❤️